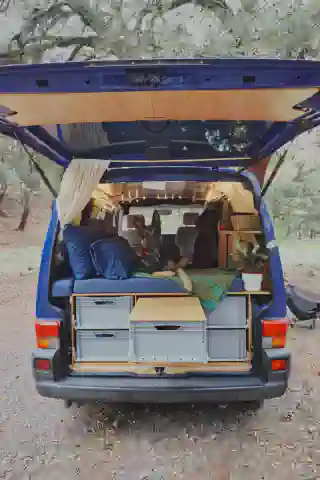
Euroboxen-System: Das Leichtgewicht und Raumwunder für deinen Van
Unser Eurobox-System ist nicht nur ein wahres Raumwunder, sondern auch ein echtes Leichtgewicht. Es spart dir eine Menge Gewicht, da es ohne schwere Auszüge auskommt. Dieses System erleichtert deinen DIY-Van-Ausbau erheblich, und die herausnehmbaren Euroboxen ermöglichen es dir, den gesamten Van in Minuten auszuräumen. Hier erklären wir dir genau, wie wir dieses System gebaut haben und geben dir einen detaillierten Plan an die Hand, damit du dir dein eigenes Regal bauen kannst.
Dieses Euroboxen-System haben wir noch nirgendwo gesehen und möchten es euch deshalb hier vorstellen.
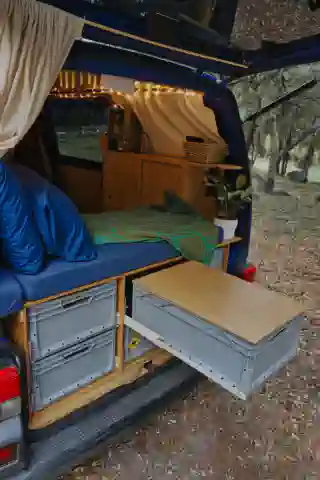
In den ersten 4 Monaten unserer Reise hat uns eine Heckschublade mit Schwerlastauszügen begleitet. Wenn wir es genau nehmen, war das auch der einzige Umbau, den wir in unserem T4 Multivan gemacht haben, bevor wir in unser 7-monatiges Sabbatical gestartet sind. Schnell wurde uns aber klar, dass diese Heckschublade nicht nur super schwer, sondern auch unpraktisch für unsere weitere Reise sein würde. Als wir im August 2021 den eigentlichen Ausbau gestartet haben, war uns schnell klar, dass die schwere Heckschublade einem besseren System weichen muss, und das sind die Gründe dafür:
- Praktikabilität: Ein einzelner Heckauszug bedeutet, für jedes kleinste Ding eine schwere Schublade zu bewegen. Selbst für eine Unterhose, besonders wenn du bergab stehst!
- Traglast: Ein Schwerlastauszug kann zwar Sinn machen, ist aber nicht die Lösung. Zwar können so schwere Lasten in einen Auszug gepackt werden, aber mehrere kleine Auszüge können insgesamt genauso viel Last tragen wie ein Schwerlastauszug.
- Kosten: Ein Schwerlastauszug ist im Vergleich zu handelsüblichen Auszügen viel, viel teurer. Überlege dir also gut, ob du wirklich einen Schwerlastauszug brauchst.
Unsere Idee
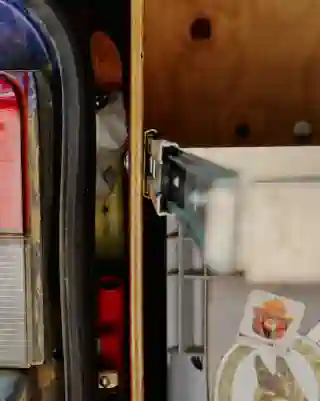
Nachdem klar war, dass wir keinen einzelnen Auszug mehr wollen, ging es ans Recherchieren, Messen und Planen. Dabei fielen uns zwei Dinge besonders auf. Erstens wurden bei vielen Vans zwar einzelne Schubladen mit einfachen Auszügen gebaut, diese sind aber nicht herausnehmbar und meist aus Holz. Wenn wir eines schon immer wussten, dann ist es, dass ein Van immer dreckig wird. Sand, eine kaputte Mehltüte oder der Orangensaft läuft aus. Da ist es doch praktischer, wenn sich die Schubladen einfach entfernen und leicht reinigen lassen. So kamen wir auf Euroboxen, die zwar nicht so schick aussehen wie Holzauszüge, aber dafür leicht sind und sich gut reinigen lassen. Im Internet haben wir sehr häufig Auszüge mit Euroboxen gesehen. Allerdings stehen diese meistens auf einem Schwerlastauszug mit einer Siebdruckplatte als Boden, und die Boxen werden oben drauf gestellt.
Unsere Idee war es, mehrere Auszüge in den Van einzubauen, die es ermöglichen, die Euroboxen einfach herauszunehmen und auf eine Bodenplatte zu verzichten!
Unser Euroboxensystem
Du benötigst:
- Auszüge für Schubladen (wir haben uns für Auszüge mit Magnet-Stop entschieden, auch wenn diese nicht ausreichen, um die Schubladen vernünftig zu sichern)
- Euroboxen (je nach Platz musst du messen, wie viele und welche Größen an Euroboxen du verwenden kannst)
- Holzkorpus (Wir haben diesen selbst gebaut aus 1 cm und 1,5 cm Fichten-Multiplexplatte)
- Alu-L-Profile
- Nieten und Nieten-Nägel
- Bohrer
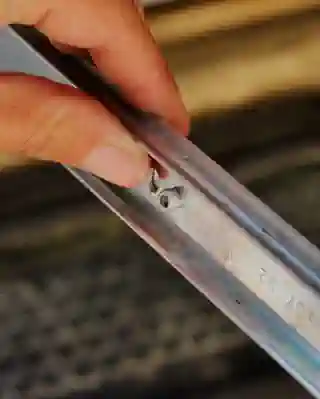
- Schritt: Messe die Aluprofile in der richtigen Länge aus und säge sie zu. Denke daran, dass die Ecken sich überlappen müssen.
- Schritt: In die Ecken der Aluprofile werden Löcher gebohrt, die übereinanderliegen, wenn die Alu-Eck-Profile aufeinanderliegen.
- Schritt: Durch die Löcher nietest du die Alueck-Profile aneinander. Aus 4 Alu-L-Profilen erhältst du einen Rahmen. Achte auf die Richtung des Alu-L-Profils!
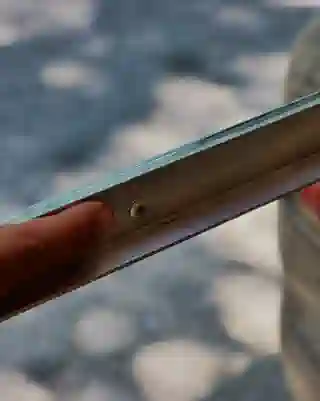
- Die langen Seiten des Alurahmens befestigst du mit Nieten an das Auszugsteil, welches ausgezogen wird.
- Die anderen Teile des Auszugs schraubst du in den Holzkorpus. Denke daran, alles wirklich gut auszumessen.
- Füge die Auszüge zusammen.
Fertig!
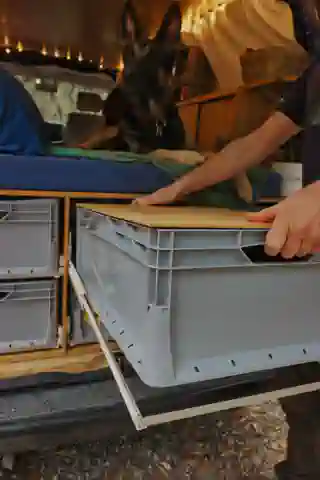
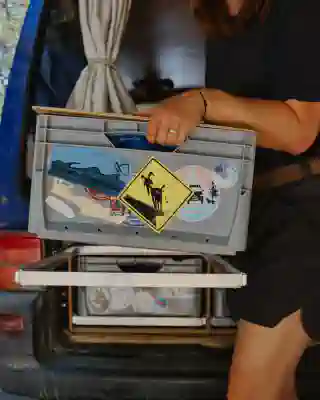
In die Rahmen lassen sich die Euroboxen hinein stellen, ohne dass du eine weitere Bodenplatte benötigst. Wenn keine Eurobox in den Rahmen gestellt ist, lassen sich diese wie ein Parallelogramm verschieben. Das ist nicht schlimm!
Unser Euroboxensystem mit Maßen und Anleitung:
Jeder Ausbau ist anders. Um dir aber einen besseren Überblick zu geben, wie wir unser Euroboxen-System gebaut haben, hier die Maße der jeweiligen Teile. In unsere Heckgarage finden so 4 große (40 cm x 60 cm) und 2 kleine Auszüge (30 cm x 60 cm) Platz.
Außenmaß Regal (BHT): 122,5 cm x 50 cm x 62 cm 1,5 cm Multiplex als Boden und Decke 1 cm Multiplex als Seiten bzw. Trennwände und Rückwand
Verwendete Euroboxen Maße (BHT): 40 cm x 21 cm x 60 cm 30 cm x 21 cm x 40 cm 20 cm x 21 cm x 30 cm
1. Auf die Grundmaße kommt es an
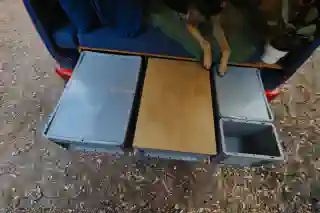
Letztendlich kannst du mit den Maßen der Euroboxen für den jeweiligen Auszug variieren. Unser Kleiderschrank besteht beispielsweise aus einer großen 40 cm x 60 cm Eurobox, die einen ganzen Auszug für sich beansprucht. Es geht aber auch anders. Unsere TTT und die Hundefutterkiste finden ebenfalls in einem Auszug Platz. Dazu haben wir zwei Euroboxen der Größe 30 cm x 40 cm hintereinander gestellt. 2x 30 cm x 40 cm = 1 Auszug von 40 cm x 60 cm. Unsere Reiseapotheke und eine weitere Kiste finden in einem der kleinen Auszüge Platz (Grundmaß 30 cm x 60 cm). Wir haben dafür eine 20 cm x 30 cm und eine 30 cm x 40 cm Box gewählt.
Natürlich kannst du das Regal auch ganz anders aufteilen. Bedenke bei allem aber die genaue Größe, damit nachher auch alles zusammenpasst!
Du siehst, du hast ganz viele Möglichkeiten.
2. Auszüge und Rahmen
Um die Euroboxen in die Auszüge zu hängen, haben wir 6 Rahmen aus den Alu-L-Profilen gebaut.
6x2 Auszüge: 1,2 cm x 4,5 cm x 60 cm
Alu-Eck-Profile: Pro Auszug 4 Alu-Profile! 4 große Schubkästen: 40 cm x 60 cm 2 kleine Schubkästen: 30 cm x 60 cm
In die Ecken der Alu-L-Profile haben wir Löcher gebohrt, um anschließend die 4 Teile zu einem Rahmen zusammenzunieten. Glücklicherweise waren in den inneren Auszügen schon Löcher, sodass wir hier nicht bohren mussten. An diesen Löchern haben wir uns orientiert und Löcher in die Längsseiten der Alu-L-Profile gebohrt, um diese anschließend ebenfalls mit Nieten zu verbinden.
3. Zusammenbau
Anschließend musst du jetzt nur noch die Auszüge selbst montieren. Achte auch dabei auf die richtige Höhe! Den Rahmen hast du ja schon an den jeweiligen zwei Auszügen befestigt und schiebst die inneren Auszüge zum Schluss in die äußeren. Das kann etwas knifflig sein, aber zu zweit geht das ganz gut. Die Euroboxen kannst du jetzt ganz bequem in den Rahmen setzen.
Das ganze System hat nicht nur den Vorteil, dass du dir Gewicht von Bodenplatten sparst, sondern auch, dass du die Schubladen mega easy herausnehmen kannst. Wir können so innerhalb von Minuten den Van ausräumen (z.B. wenn wir ein AirBnB beziehen oder mal feststecken und den Van leichter machen müssen). Wie wir unsere Euroboxen sichern, kannst du in diesem Artikel nachlesen.