
Unser DIY Wassersystem
Vor fast zwei Jahren sind wir von 5l-Kanistern mit Auslaufhahn zu einem "richtigen" Wassersystem gewechselt. Wie so häufig haben wir kein fertiges System gefunden, das uns gefallen hat und in unser Konzept gepasst hat. Im T4 haben wir sehr wenig Platz, alles muss auf den Zentimeter ausgenutzt werden. In diesem Artikel stellen wir euch nun unser Wassersystem vor, zeigen euch unser UV-Wasserdesinfektionsprozess und geben Ideen, falls ihr ebenfalls etwas ähnliches plant.
Werbung, unbeauftragt! Bei diesem Text handelt es sich um einen redaktionellen Beitrag, der unbeabsichtigt durchaus eine werbende Wirkung beim Leser haben könnte, ohne dass ich von irgendeinem Unternehmen dafür beauftragt wurde!
Rudimentär - der Start
Wir sind ohne richtigen Camperausbau auf unsere Reise gestartet. Das war aus unserer Sicht eine gute Idee, den nur so konnten wir rausfinden, worauf es wirklich ankommt. So war das auch mit dem Wasser - Anstelle eines Tanks, Pumpen und Anschlüssen haben wir einfach einige 5l Kanister eingepackt. Dazu ein Auslaufhahn, den wir immer durchgetauscht haben.
Das war einfach und günstig. Keine Gefahr von Lecks, wir konnten an jeder Quelle auffüllen, ohne uns Gedanken über Anschlüsse etc machen zu müssen. Auch wenn wir nicht direkt an den Anschluss ranfahren konnten war das kein Problem, schließlich lassen sich die Kanister ja tragen.
Die Kanister-Variante hatte nur einen gravierenden Nachteil: Es braucht Platz. Und zwar den schnell zugänglichen, extrem wertvollen Platz IM Van. Als wir vor 2 Jahren Nelly adoptierten, mussten wir genau das optimieren. Zwei Menschen und zwei Hunde im kurzen T4, da musste irgendetwas weichen. Bei uns waren es unter anderem die 6 x 5l Wasserkanister.
Die Idee
Um das Wasser aus dem Innenraum nach draußen zu befördern, kam für uns eigentlich nur ein Unterbodentank in Frage. Da wir meistens im warmen Unterwegs sind, wollten wir unser Trinkwasser nicht in der prallen Sonne auf dem Dach transportieren. Außerdem will man ja den Schwerpunkt des Autos nicht unnötig nach oben verlagern.
Viel freien Platz hat der Unterboden, gerade beim kurzen T4, allerdings auch nicht zu bieten. Dazu kommt, das so ein Tank natürlich ordentlich befestigt sein will, wenn man ihn nicht nach der nächsten Bodenwelle von der Straße aufheben möchte.
Die schlagende Idee kam dann, als ich mich an den Rapsöl-Umbau von meinem Vater erinnert habe. Die hatten doch ganz viele verschiedene Tanks! Und siehe da, einer passte wie die Faust aufs Auge: Ein runder, 15" großer Radmuldentank, wie gemacht für den Ersatzradhalter!
Soweit, so gut, aber wohin mit dem Ersatzrad? Das musste sowieso mal ausgetauscht werden, da es schon seit 23 Jahren fröhlich am Unterboden vor sich hin rostete… Auch dafür haben wir eine super Lösung gefunden, aber das kommt mal ein einem anderen Artikel.

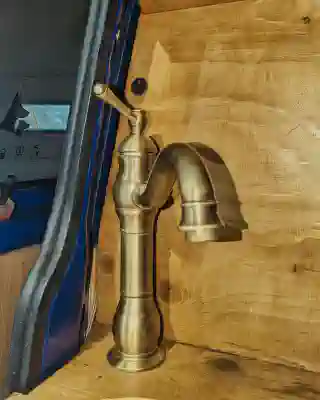
Nur mit einem Wassertank kommt man aber nicht weit. Es musste also eine Pumpe her. Außerdem hat Jo sich schon einen schicken Wasserhahn ausgesucht…
Tatsächlich haben wir uns bei unserer ersten Lösung gegen eine Tauchpumpe und für eine Pumpe im Innnraum entschieden. Wir hatten einfach Sorge, wenn wir doch mal in kälteren Regionen unterwegs sind, das uns die Pumpe einfriert und kaputt geht. Heute sind wir schlauer: Saugpumpen sind laut, brauchen unfassbar viel Strom und halten nicht lange. So eine kleine Tauchpumpe ist da praktischer. Wenn es kalt wird (Wie im kanadischen Winter), müssen wir den Tank halt leer pumpen. Und sollte doch mal was passieren, können wir so eine (sehr günstige) Pumpe einfach tauschen.
Der Plan
Wenn man vor so einem Tank steht und kein Klempner ist, kann das schon erstmal schwierig wirken… Für einen einzigen Wasserhahn an so einem Tank braucht man nämlich:
- Eine Zulaufleitung, der zum Wasserhahn führt
- Eine Rücklaufleitung, um den Tank wieder befüllen zu können
- Einen Überlauf, damit der Tank beim Befüllen mit Druck nicht platzt
- Eine Entlüftung, damit wieder Luft in den Tank kommen kann, wenn man entleert
- Eine Pumpe inkl. Strom, damit auch Wasser aus dem Zulauf kommt
- Tankuhr / Tankgeber um den Wasserstand zu messen
- Zusätzlich haben wir uns noch UVC-Leds eingebaut, um das Wasser im Tank zu sterilisieren
Damit man dabei den Überblick behält, hilft es immer, erstmal einen groben Plan zu machen. Hier ist unserer:

Die blauen Leitungen sind die Wasserleitungen. Wir müssen nur den Zu- und Rücklauf in das Auto führen, der Überlauf bleibt einfach unter dem Auto. Die roten (+) und schwarzen (-) Leitungen sind die Stromleitungen. Damit wir nicht drei Adernpaare durch den Unerboden führen müssen, packen wir die Masse der LEDs und der Pumpe zusammen sowie das Plus der LEDs und des Tankgebers. Evtl. hätte der Tankgeber auch auf die gleiche Μasse gekonnt, allerdings hat sich unsere Tankuhr dann etwas komisch verhalten, sobald die Pumpe an ist.
Die Vorbereitung
Nachdem der Plan klar war, mussten erstmal die Teile beschafft werden. Der Tank hat uns dabei schon einiges vorgegeben: Der Zulauf hat ein 1/4 Zoll Gewinde, der Rücklauf 3/8 Zoll. Für die LEDs haben wie einfach passende Löcher in den Tankdeckel gebohrt und sie mit Silikon eingeklebt. Für die Verkabelung am Unterboden haben wir noch eine kleine Wasserdichte Anschlussdose besorgt, sowie ein 4 adriges Kabel das wir dann in den Innenraum führen. Für die Wasserleitungen haben wir lebensmittelechten Gewebeschlauch mit einem Innnendurchmesser von 1/2 Zoll verwendet. (Die Größe war Zufall, man nimmt was der Baumarkt hergibt…)
Da wir bei unserem T4 das V80 Gebläse entfernt haben, hatten wir sowieso schon freie Durchführungen hinten rechts. Darüber war nur die Bodenplatte, die wir eingepasst hatten. Wir haben also einfach Bodenplatte über den Löchern wasserdichte Kabeldurchführungen eingelassen und ausenrum mit Teerfarbe abgedichtet.
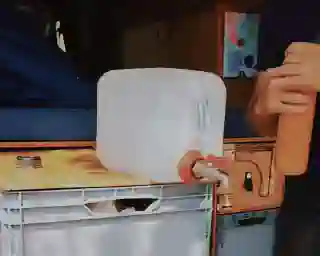
Im Innenraum angekommen, haben wir auf das Schlauchende des Rücklaufs einfach einen Gardena-Anschluss zur Befüllung gebastelt. Der Zulauf geht auf ein 3/8 Zoll Gewinde, durch einen Absperrhahn und Y-Stück auf beide Anschlüsse (warm und kalt) des Wasserhahns. Als Waschbecken dient uns eine Salatschüssel. Auf einen Grauwassertank haben wir erstmal bewusst verzichtet. Wenn die Schüssel voll ist, müssen wir entsorgen. Das kann zwar nervig sein, aber dafür haben wir keinen weiteren (stinkenden) Tank im Auto.
Für die Wasseranschlüsse brauchen wir also:
- 1x Unterbodentank mit Tankgeber und Uhr
- 15m Schlauch
- 2x Kabeldurchführung, groß genug für den Außendurchmesser des Schlauchs
- 1x Schlauchanschluss, 1/4 Zoll Gewinde (Zulauf Tank)
- 2x Schlauchanschluss, 3/8 Zoll Gewinde (Rücklauf Tank, Anschluss Wasserhahn)
- 1x Schlauchanschluss, 1/2 Zoll Gewinde (Anschluss Rücklauf, Gardena-Aufsatz)
- 1x Gardena-Anschluss, 1/2 Zoll Gewinde
- 1x Absperrhahn, 3/8 Zoll Gewinde
- 1x Y-Stück, 3/8 Zoll Gewinde
- 1x Wasserhahn (Handelsüblich)
Und für die Elektrik:
- 1x 12V Tauchpumpe
- 2x 12V UVC LEDs
- 5m 4-adriges Kabel ( mind 1mm² Querschnitt für eine 2A Pumpe )
- 1x Wasserdichte Anschlussdose
- 2x Schalter
- 1x Handvoll Waco und/oder Lüsterklemmen :)
Der Einbau
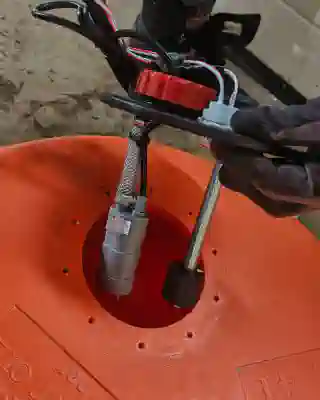
Fangen wir mal IM Tank an: Hier muss eigentlich nur die Tauchpumpe rein. Da diese sehr leicht ist, müssen wir sie nicht großartig fixieren. Der Gewebeschlauch ist starr genug, damit wir die Pumpe einfach “dranhängen” können. Das Stück schlauch zwischen dem Tankdeckel und der Pumpe muss dann nur noch genau die richtige Länge haben, damit die Pumpe gerade so über den Tankboden schwebt.
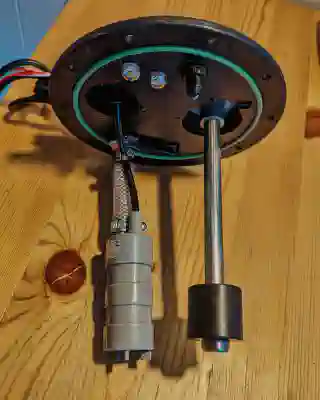
Von den LEDs haben wir die weißen Gewindeteile entfernt, da der Deckel zu dick für die Konterschraube ist. Wir haben einfach ein Loch möglichst passend zur wasserdichten Hülle der LEDs gebohrt und diese dann mit Silikon reingeklebt.
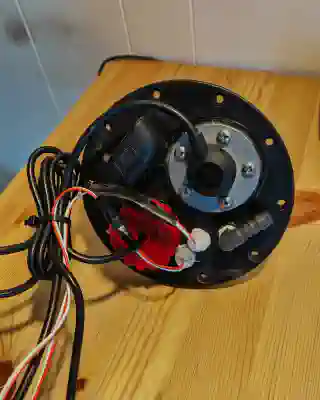
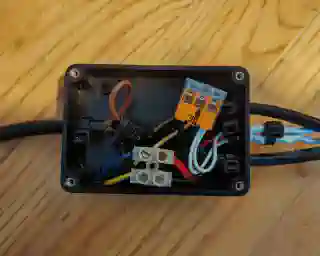
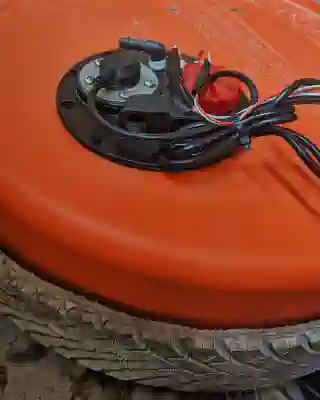
Die Stromanschlüsse für LEDs und Pumpe haben wir dann in die Anschlussdose geführt und mit dem 4 adrigen Kabel entsprechend dem Plan verbunden. Die Dose selbst haben wir einfach auf den Tank gelegt und mit einem Kabelbinder an den angeschlossenen Schläuchen befestigt.
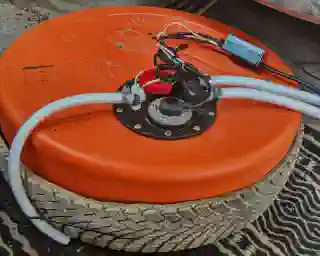
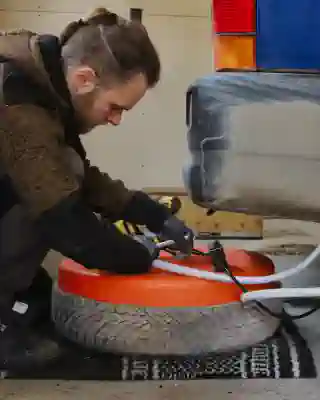
Um den Tank selbst zu schützen, haben wir uns von einem Reifenhändler einen alten 15 Zoll Reifen besorgt (die geben die gern Umsonst her, da die eh teuer entsorgt werden müssen). Den Reifen haben wir dann aufgeschnitten und den Tank reingelegt. Für den Überlauf haben wir ein kurzes Stück schlauch seitlich am Tank runtergeführt und an dem Reifen befestigt.
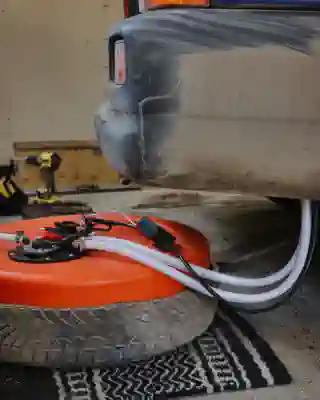
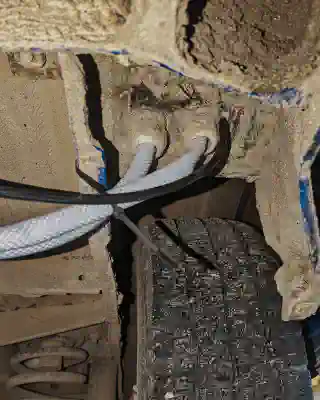
Das 4 adrige Kabel sowie den Zu- und Rücklauf haben wir dann durch mit Kabeldurchführungen hinter dem rechten Radkasten nach innen geführt. Der Rücklauf ist einfach, den haben wir am Heckregal mit einer Besenhalterung angebracht. Dadurch kommen wir einfach beim Befüllen ran und können den Anschluss sogar nach hinten ein wenig raushängen lassen. Der Zulauf führt über den Radkasten unter dem Seitenregal nach vorn, wo er über ein Y-Stück mit dem Wasserhahn verbunden ist.
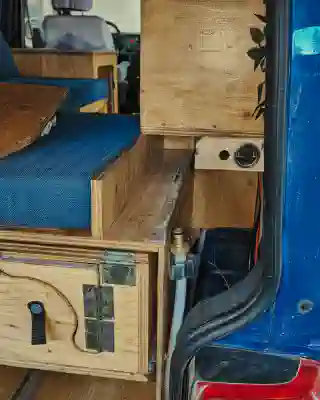
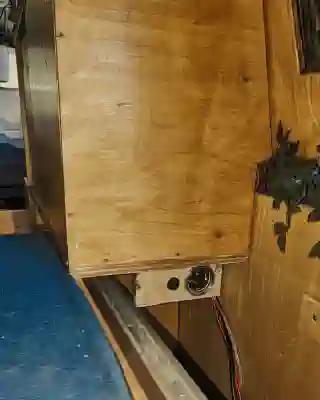
Die Elektrik ist ein wenig aufwendiger. Der Schalter für LEDs, Tankgeber und -uhr, sowie die Tankuhr selbst ist in eine kleine Platte eingelassen, die wir über dem Radkasten montiert haben. Dadurch ist sie nicht im Weg aber leicht zugänglich. Die Beleuchtung der Tankuhr ist ebenfalls mit dem Schalter verbunden, so kann man einfach erkennen ob die UVC-LEDs im Tank an sind. Den Schalter für die Tauchpumpe haben wir nach vorne geführt, ganz in die Nähe des Wasserhahns.
Fazit
So ein Wassertank ist ein ziemlich kompliziertes Vorhaben im Vergleich zu einfachen Wasserkanistern. Allerdings befreit der Tank am Unterboden doch sehr viel Platz im Innenraum - und der ist bei uns kostbar. Wenn es am Platz nicht mangelt, würde ich aber empfehlen einfach einen Kanister direkt unter dem Wasserhahn einzuplanen. Damit spart man sich eine Menge Verlegearbeit und hat wieder ein einfaches System - sowohl beim Einbau also auch in der Wartung. Als Pumpe würde ich mittlerweile immer eine Tauchpumpe empfehlen. Die braucht deutlich weniger Energie und ist erheblich leiser. Wir sind glücklich mit unserer Lösung. Trotz des Aufwands haben wir nahezu nur Teile benutzt, die man bei Bedarf auch überall auf der Welt im nächsten Baumarkt findet. Denn ALLES, was man dabei hat KANN und WIRD irgendwann kaputt gehen.
Viel Spaß beim Basteln!
Euer Georg