
In drei Schritten zum Sauerteig-Brot!
Wir haben schon vor unserer Reise unser eigenes Brot gebacken. Unterwegs im Van, vor allem ohne Kühlschrank, ist das schon schwieriger. Jetzt in unserem Winterdomizil haben wir wieder einen Backofen, und unsere lieben Nachbarn haben uns einen Sauerteigstarter organisiert! Wie auch du ganz einfach dein eigenes Brot backst, erfährst du hier!
Sauerteig Brot zu backen ist super einfach und braucht nicht viel vorbereitung. Nur der Teig selbst braucht etwas Zeit, damit er gehen kann. Du solltest also rechtzeitig anfangen!
Zutaten
Zutaten brauchst du nicht viele:
- 1kg Mehl
- 2 Esslöffel Salz
- 500g Wasser
- 200g Sauerteig-Starter
- optional: Kürbiskerne, Mohn, oder mit was auch immer du gern dein Brot garnierst!
Schön, aber woher bekomme ich den Starter? Damals in Hamburg haben wir einen guten (und sehr alten) Starter auf einem Bauernmarkt ergattern können. Manchmal bekommt man auch einen bei einem (richtigen) Bäcker. Hier in Kanda hatten wir das Glück, das unsere Nachbarn jemanden kannten, der einen kennt… Viele liebe Grüße an der Stelle! Übrigens: Der Sauerteig aus dem Supermarkt meistens kein Starter, den kann man nur für den Geschmack zu einem Hefebrot geben. ALSO: Am besten einfach herumfragen, googlen oder auf unseren follow-up warten!
Hier nun drei einfache Schritte, wie du zu deinem Brot kommst:
-
Schritt 1
-
Schritt 2
-
Schritt 3
Für die Generation vor Youtube, hier nochmal zum nachlesen:
1. Bereite den Teig vor!
Um aus den Zutaten nun einen Teig zu machen, folge einfach der Anleitung:
- Gib 1kg Mehl in eine große Schüssel
- Füge 1 Esslöffel Salz und 200g Sauerteig starter hinzu
- Fang mit einer Hand an zu rühren, die andere brauchst du noch!
- Gibt nach und nach 500g Wasser hinzu
- Immer schön weiter rühren/kneten. Der Teig wird erstmal sehr klebrig und an deiner Hand hängen. Aber keine Sorge! Einfach mutig weiterkneten, das wird schon!
- Nach etwa 5-10min kneten sollte der Teig fester werden, und du kannst ihn aus der Schüssel heben und auf der Arbeitsfläche weiterkneten. Nimm dazu die zweite Hand!
- Nach weitern 5-10min sollte der Teig schön gleichmäßig sein und sich ziehen lassen. Du hast es fasst geschafft!
- Zum Schluss forme eine schöne Kugel und reib den Teig mit etwas Mehl ein, damit er nicht zu sehr in der Schüssel klebt.
- Leg den eingeriebenen Teig wieder in die Schüssel, decke ihn mit einem Geschirrtuch ab und lass ihn mind. 12 Stunden gehen.
2. Füll deinen Starter nach!
Den Starter wieder zu vermehren, ist wohl der einfachste Schritt:
- Füll dein (hoffentlich großes) Glaß bis 1/3 mit Mehl
- Füge so viel Wasser hinzu, das du den Starter einfach mit einem Löffel umrühren kannst
- Kräftig umrühren, und ab in den Kühlschrank!
3. Back dein Brot!
- Nach dem der Teig ca 12h gegangen ist, sollte er kräftig gewachsen sein.
- Der Teig is so groß, wir können direkt 4 Brote daraus backen. Also einfach den Teigling nochmal sanft kneten und dabei in 4 gleiche Teile teilen.
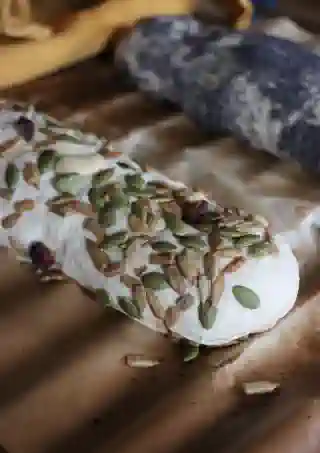
- Die Teiglinge in eine längliche (oder jede beliebige Form) bringen und auf ein Backblech mit Backpapier auslegen.
- TIPP: Wenn du es etwas aufpeppen willst, jetzt solltest du die Teiglinge mit Kürbiskernen, Mohn oder sonst irgendwas garnieren!
- Die Teiglinge im Idealfall nochmal etwa 30min auf dem Blech gehen lassen, dann aber ab in den Ofen: ca 220 Grad für 45min.
- Ob das Brot durch ist, kann man ganz einfach testen: Dreh es um und klopfe auf den Boden. Klingt es hol, ist es fertig!