
Starlink platzsparend, sparsam und ohne Wechselrichter!
Es ist ein Gamechanger: Dank Starlink kann man fast überall sein und hat dabei so gutes Internet, um damit mehr als problemlos mobil arbeiten, spielen oder streamen zu können. Aber es gibt vertragliche und technische Einschränkungen. Neben Geolocks gibt es keinen offiziellen Support für den Betrieb ohne Wechselrichter oder eigenen Router. Für uns wäre es das erste Gerät, das zwinged einen Inverter benötigt. Dieser und der klobige originale Router würden unnötig Platz und Energie in unserem kleinen T4 verbrauchen. Wir haben diese Probleme gelöst und ein Setup gefunden, das einwandfrei funktioniert. Ob so dieses Setup auch etwas für euch wäre, lest ihr in diesem Artikel.

Werbung, unbeauftragt! Bei diesem Text handelt es sich um einen redaktionellen Beitrag, der unbeabsichtigt durchaus eine werbende Wirkung beim Leser haben könnte, ohne dass ich von irgendeinem Unternehmen dafür beauftragt wurde!
Achtung, nicht nachmachen! Die Modifikationen, die wir vorgenommen haben, können Garantie und/oder Gewährleistung der Hardware beeinträchtigen. Dieser Artikel ist nur eine Beschreibung unserer eigenen Lösung. Wenn ihr euch inspiriert fühlt irgendetwas davon nachzumachen, ist das eure Verantwortung! Wenn man mit Elektrik arbeitet, ist immer Vorsicht geboten und auf Sicherheit zu achten! Wir können nichts dafür, wenn ihr irgendwelche Probleme/Schäden oder ähnliches mit diesen Informationen verursacht.
Starlink platzsparend, sparsam und ohne Wechselrichter!
Wieso eigentlich?
Unser Motto war immer: Keep it simple. Vanlife is not rocket science. Wenn wir uns nun über Satellit mit dem Internet verbinden, klingt das doch sehr kompliziert und irgendwie doch nach rocket science, oder? Dieser Einwand ist auch mehr als berechtigt. Wir haben uns diese Entscheidung auch nicht leicht gemacht und lange evaluiert.
Als wir noch durch Europa gereist sind, haben wir uns bewusst gegen Internet über Starlink entschieden. Die Tarife sind nunmal doch sehr teuer und in Europa ist die Netzabdeckung über LTE oder 5G sehr gut. Selbst der teuerste Unlimited Tarif ist in der Regel günstiger als Internet per Satellit. Und bis auf wenige Länder (wie Deutschland) hat man auch in entlegeneren Regionen meist guten Empfang.
Nun stand aber unsere Entscheidung fest, das wir Amerika unsicher machen wollen. Gerade in Kanada wissen wir sogar aus eigener Erfahrung, das die Situation dort eine andere ist. Das Land ist sehr viel größer und auch dünner Besiedelt. Wenn Kilometerweit nichts ist, wieso sollte man da alle paar Kilometer einen Handymast betreiben? Das macht keinen Sinn und das sieht man auch in der Realität. Verlässt man Städte und Autobahn, wird der Empfang schnell dünn. Man kann froh sein, wenn es noch für ein Telefonat oder Notruf reicht.
Da wir aber doch lieber in der Natur unterwegs sind, wollten wir nicht alle paar Tage wieder die nächste Stadt aufsuchen müssen. Schon gar nicht um einfach nur ins Internet zu kommen. Da ist eine Anbindung per Satellit schon sehr praktisch, zumal die Datentarife in Kanada/USA preislich auch nicht mehr so weit von den Starlink Tarifen entfernt sind. Und was die technischen Herausforderungen angeht: Da ist Georg dann doch zu sehr Bastler, um sich davon aufhalten zu lassen!
Wieso DIY? Es gibt doch Starlink für RVs?
Ja und nein. Starlink für RVs bzw. Roaming sind erstmal nur Preismodelle, die haben mit der Technik nichts zu tun. Als wir das Starlink eingebaut haben, gab es auch bei diesen Tarifen lediglich die “normale”, rechteckige Starlink Schüssel (Dishy). Diese kann nicht fest aufs Autodach montiert werden, da sie sich frei drehen und neigen kann und nicht für die Autobahn gemacht ist.
Eine weitere Einschränkung bildet der Router: Es handelt sich dabei und ein einziges Gerät, mit nur zwei Kabeln: Dem Stromkabel (Kaltgerätestecker) und dem Kabel für das Dishy, mit einem speziellen, nicht handelsüblichen Stecker. Eine andere Möglichkeit, Dishy mit Strom zu versorgen und eine WLAN-Verbindung zu bekommen, gibt es erstmal nicht. Laut Starlinks FAQ: “Wir bieten keine Gleichstrom-Netzteile an. Das Starlink-Netzteil ist kompatibel mit DC-AC-Wechselrichtern mit modifiziertem Sinus und reiner Sinuswelle.”1. Möchte man Starlink ohne Modifikation im Van betreiben, braucht man zwingend einen Wechselrichter.
An dieser Stelle sei gesagt: Wenn ihr bereits einen Wechselrichter und genug Platz bei euch habt, bleibt dabei! Denn die Einrichtung in diesem Fall ist Kinderleicht. Stecker rein, fertig. Ob der geringere Stromverbrauch für euch dann noch eine Rolle spielt, müsst ihr wissen!
Bei uns im T4 mit kurzem Radstand und ohne Landstrom zählt aber nun mal jeder Zentimeter und jedes Ampere. Daher musste eine andere Lösung her.
Nun aber zur Sache: Was habt ihr gemacht?
Erstmal hat Georg sehr viel recherchiert und sich tiefer mit der Technik befasst. Natürlich sind wir nicht die ersten, die so etwas machen. Es gibt einige andere Hacker, Enthusiasten und sogar Vanlifer mit ähnlichen Setups. Wir haben die Quellen verlinkt und möchten an dieser Stelle ein großes Danke sagen für all diese Informationen! Was dabei zusammengekommen ist, möchten wir hier einmal aufbereitet zusammenfassen. Der zentrale Punkt dabei ist das mysteriöße Starlink Kabel, dessen Geheimniss wir hier nochmal lüften wollen.
Spätestens hier wird der Artikel sehr technisch. Um ihn nicht noch länger zu machen, verzichten wir darauf jeden Begriff zu erklären. Wir sind hier schließlich im Internet wo man alles nachschlagen kann :)
Ein kleiner Einblick in die Technik
Hinter dem grauen Kabel mit dem speziellen Stecker versteckt sich ein einfaches Netzwerkkabel. Ein Cat 5e AWG 24 F/UTP Kabel um genauer zu sein2. Warum Starlink das mit einem diesem Stecker versieht, kann man natürlich nur vermuten. Ein wichtiger Grund ist vermutlich die Stromversorgung von Dishy: Diese kann bis zu 180W ziehen, was sich mit regulärem PoE (power over ethernet) nicht möglich wäre.
Um die Stromversorgung dennoch sicher zu stellen, werden auf alle 4 Adernpaare 48V angelegt. Mit maximal 1A pro Adernpaar könnte man damit zumindest kurzzeitig bis zu 192W übertragen, ohne das es brennt. Das ist natürlich mehr als der Standard zulässt, was wohl auch der Grund für die veränderte Belegung ist. So liegt Plus auf den Adern 1,2,3,6 und Minus auf 4,5,7,83. Der Standard sagt auch hier etwas anderes, also müsste man schon an der Belegung der Stecker herumfurwerken…
Der Plan
Da wir jetzt wissen, wie Dishy angebunden ist, können wir unsere Lösung aufbauen. Die Idee ist, das modifizierte PoE selbst aufzubauen und dahinter einfach Ethernet zu sprechen. Grob sollte das ganze dann so aussehen:
Interessant wird es bei den Verbindungen die in der Zeichnung RJ45* heißen: Hier schneiden wir die originalen Stecker ab und crimpen RJ45 Stecker darauf. Vor und nach dem PoE Injector vertauschen wir aber die blauen und grünen Adernpaare. Der Tausch auf der Dishy Seite sorgt dafür, das die Spannungen an die Dishy richtig angelegt werden. Der Tausch auf der Raspberry Seite sorgt dafür, das wieder normales Ethernet gesprochen wird.
OziCyberNomad4 hat das schön erarbeitet. Wenn man die Adern 3,4 und 5,6 auf beiden Seiten tauscht, kommt bei Dishy die richtige Spannung an und beim Router wieder normales Netzwerk:
Für unser Setup haben wir verwendet:
- PoE Injector: Tycoon POE-INJ-1000-WT
- Netzteil: XWST DC DC Voltage Converter
- Router: Raspberry Pi 4B
- Patchkabel und RJ45-Stecker (mit Erdung!)
Es müssen natürlich nicht genau diese Produkte sein. Allerdings habe ich zumindest für den PoE Injector keine Alternative gefunden, die ich zu dem Zeitpunkt des Umbaus bestellen konnte. Fertige Lösungen wie Dishypowa waren zu dieser Zeit noch nicht fertig bzw. lieferbar. Besonders Dishypowa V2 sieht sehr vielversprechend aus, da es auch das Netzteil beinhaltet. Beim Netzteil sollte man darauf achten, das die Leistungsaufnahme der Dishy sehr stark schwankt.
UPDATE 2024-03-13: Das DishyPowa Projekt scheint es wohl nicht mehr zu geben. Die Domain ist nicht mehr erreichbar, daher habe ich den Link entfernt. Letztes Jahr haben wir 615 Happiness getroffen, welche sich von unserem Umbau inspieren liesen. Die haben die Adapter von yaosheng erfolgreich im Einsatz, den Einau haben sie in einem VLog beschrieben.
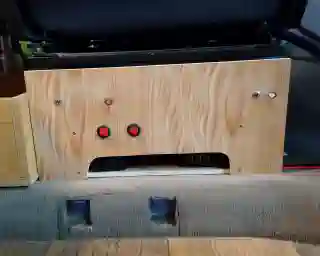
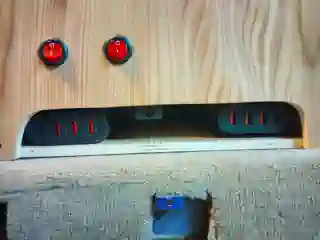
Neben dem Internet-Setup haben wir noch eine weitere Komponente: Wenn wir darüber arbeiten wollen, müssen wir irgendwo unsere Laptops laden. Dank USB-C PD benötigt man dafür auch keine speziellen Adapter mehr, allerdings müssen die Ladegeräte auch die entsprechende Leistung von 65W bringen. Da wir zu zweit sind, haben wir auch zwei Ladegeräte, damit sind wir auch wieder bei 130W maximaler Leistungsaufnahme. Das ist nicht wenig und bekommt daher eine eigene Leitung zum Sicherungskasten. Außerdem möchten wir noch die Möglichkeit haben, beide Systeme nach Bedarf ein- und auszuschalten.
Natürlich wollen wir auch sicherstellen, das unser Auto nicht abrennt. Deshalb müssen wir das ganze noch absichern. Dishy und Raspberry sollten zusammen nie mehr als 195W ziehen, auf 12V sind das 16A. Die beiden Ladegräte sollten nicht mehr als 130W verbrauchen, das sind entsprechend knapp 11A. Wir haben uns am Ende für eine 20A und eine 15A Sicherung entschieden. Die Kabel (und Schalter!) sind dementsprechend dimensioniert.
Mit diesen Dingen erweitert sich unser Plan etwas:
Der Einbau
Da wir nun den lästigen Router und den Bedarf für einen Wechselrichter losgeworden sind, können wir alles schön Platzsparend verbauen. Bei uns im T4 bietet sich für solche Technik die Sitzkonsole des Beifahrersitzes an. Alles passt entspannt rein, man kommt einfach ran wenn man mal etwas reparieren muss und wir brauchen den Platz sonst eigentlich nicht. Weiterer Vorteil: Die Bordbatterie ist in der Sitzkonsole des Fahrersitzes. Da Dishy und Ladegeräte doch sehr energiehungrig sind, muss man bei 12V entsprechend dicke Kabel einplanen. Da ist es gut, nicht so viel Strecke zwischen Batterie und Verbraucher zu haben.
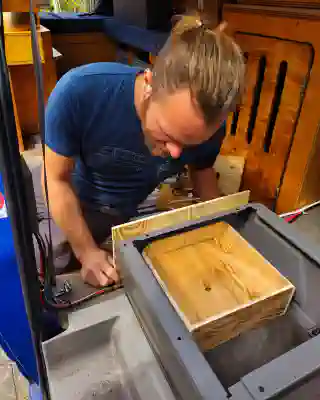
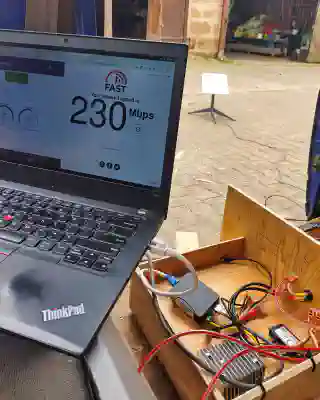
Wir haben hier zwei Fliegen mit einer Klappe geschlagen und uns kurzerhand eine hübsche Unterkonstruktion eingebaut. Ein weiteres kleines Gimmick: Neben den Ladegeräten kommt man von vorne noch an einen USB-Ethernet Adapter, der am Raspberry hängt. Damit bekommt man die Verbindung zum Router nicht nur per WLAN.

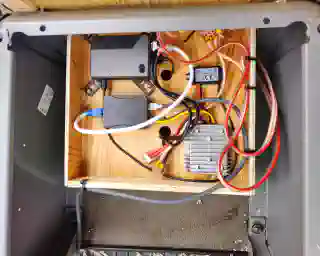
Wie man sieht ist die Technik auf Holz verbaut. Ich würde eigentlich lieber etwas feuerfestes nehmen, das hatten wir aber nicht zu Hand. Da aber alle Komponenten in einem eigenen, passenden Gehäuse sind, ist das für uns ausreichend.
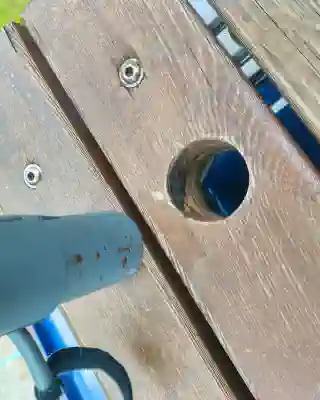
Zum Schluss fehlt nur noch ein Platz für Dishy selbst. Bei dem Paket von Starlink ist ein großer Standfuß mitgeliefert worden. Der ist eigentlich ganz praktisch, wenn man nicht immer unter freien Himmel parken möchte, sondern zum Beispiel im Schatten unter Bäumen. Für uns verbraucht der Fuß aber zu viel Platz beim Transport, und wegen der fest verbauten Solar auf dem Dach hat sich das mit dem Schatten sowieso erledigt. Gegen die Sonne haben wir neben den Photovoltaikpanels eine Dachterasse, die das restliche Dach beschattet. Und genau diese nutzen wir jetzt für Dishy. Wir haben einfach in eine der Latten ein 30mm Loch gebohrt und darunter mit einem kleinen Stück holz aufgedoppelt. Das hält super und könnte wohl nicht einfacher sein.

Und das funktioniert?
Für uns funktioniert dieses Setup einwandfrei. Sogar die offizielle Starlink App kommt damit klar, das Dishy ohne den offiziellen Router läuft. Alle Funktionen, die den Router betreffen, werden einfach ausgeblendet. Das eigentliche Gehirn des ganzen befindet sich aber in der Schüssel selbst. Verbindet man sich per Ethernet mit Dishy, bekommt man auf der Ebene darüber eine IP, Gateway und DNS per DHCP konfiguriert. Damit kommt man bereits ins Internet.
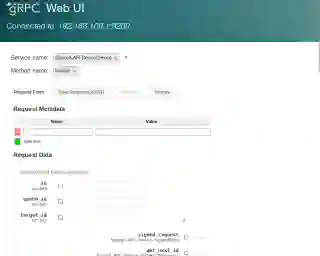
Man kann sogar mit Dishy kommunizieren: Entweder per Weboberfläche unter dishy.starlink.com oder per gRPC. Letzteres ist nützlich, um zum Beispiel den Status von Dishy abzurufen oder sie in den Stow Mode für den Transport zu fahren. Verbinden kann man sich über die Gateway-Adresse auf Port 9200. Bequemerweiße ist sogar gRPC Reflection unterstützt, man kann also die Spezifikation abrufen und z.B. grpcurl oder grpcui verwenden.
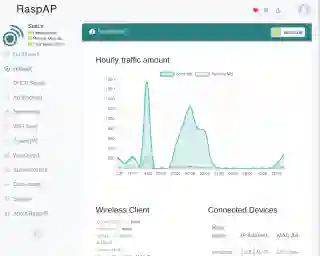
Als Router und WLAN Access Point verwenden wir den Raspberry, den wir schon länger im Bulli verbaut haben. Dank RaspAP ist die Einrichtung auch sehr einfach und man bekommt eine nette Weboberfläche. Wie oben erwähnt haben wir noch einen USB-Ethernet Adapter an den Raspberry angeschlossen, um auch per LAN eine Verbindung zu ermöglichen.
Fazit
Starlink ist zwar teuer, aber in Ländern wie Kanada wohl die einzige Möglichkeit vernab von Städten wirklich gutes Internet zu bekommen. Es ist schon beeindruckend, wenn man einfach irgendwo in die Pampa fahren kann, ohne auf Signalstärke sehen zu müssen. Das man doch so viel Aufwand betreiben muss, um ohne Wechselstrom klar zu kommen, ist zwar Schade aber immerhin ist es realistisch möglich.
Wir hoffen der Artikel hat euch einen guten Einblick in unser Setup gegeben. Wenn ich noch Fragen habt, oder sogar Tipps wie es noch besser geht, schreibt uns gern auf Instagram oder einfach per Mail!